HTML / CSS / JS
ビジュアル
![]() 2026/02/14
2026/02/14
![]() 2026/2/8
2026/2/8
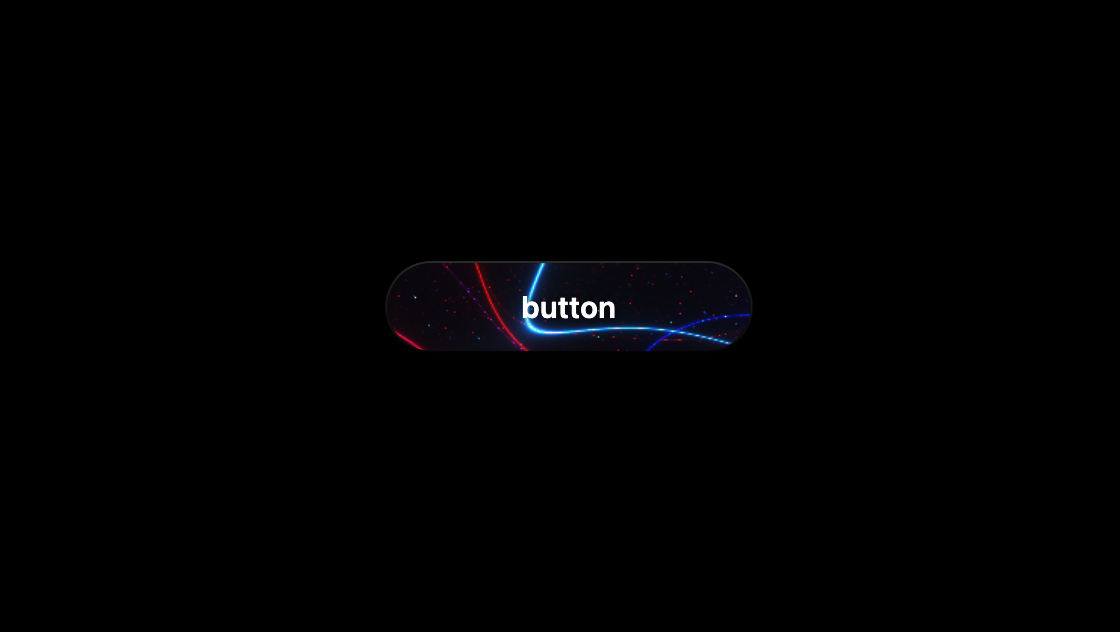
ボタンにただホバー効果を付けるだけでは物足りない。そんなときに使えるのが、Canvas(WebGL)で描いたアニメーションをボタンの中に敷く方法です。
このサンプルは、赤と青のノイズラインが常にゆらぎ、押している間だけ動きが加速して脈動が強まる“生きている”ボタンをCSSとJSで実装します。
<button class="chaos-button">
	<canvas class="chaos-canvas"></canvas>
	<span class="chaos-label">button</span>
</button>@import url('https://unpkg.com/normalize.css') layer(normalize);
@layer normalize, base, demo;
@layer base {
:root {
--font-size-min: 16;
--font-size-max: 20;
--font-ratio-min: 1.2;
--font-ratio-max: 1.33;
--font-width-min: 375;
--font-width-max: 1500;
}
/* 1. HTMLとBodyの背景色を即座に黒に固定してホワイトフラッシュを防止 */
html, body {
background: #000 !important;
color-scheme: dark;
}
*, *:after, *:before {
box-sizing: border-box;
}
body {
display: grid;
place-items: center;
min-height: 100vh;
margin: 0;
font-family: 'SF Pro Text', 'SF Pro Icons', system-ui, -apple-system, sans-serif;
overflow: hidden;
}
}
@layer demo {
.chaos-button {
position: relative;
border: none;
background: #111;
/* 背景を透過させず暗い色を置いておく */
padding: 0;
cursor: pointer;
width: 240px;
height: 60px;
border-radius: 150px;
overflow: hidden;
transition: transform 0.2s;
background: linear-gradient(#333, #000);
display: flex;
align-items: center;
justify-content: center;
/* 2. 初期状態を透明にしておき、JSで準備ができたら表示させる */
opacity: 0;
}
.chaos-button:hover {
transform: scale(1.02);
}
.chaos-button:active {
transform: scale(0.98);
}
.chaos-canvas {
position: absolute;
inset: 2px;
display: block;
height: calc(100% - 4px);
width: calc(100% - 4px);
border-radius: inherit;
background: #000;
/* Canvas自体にも背景色を指定 */
}
.chaos-label {
position: relative;
z-index: 1;
display: block;
color: white;
font-size: 18px;
font-weight: 600;
letter-spacing: 0.5px;
text-shadow: 0 0 10px rgba(0, 0, 0, 0.8);
pointer-events: none;
text-transform: lowercase;
}
:active .chaos-label {
mix-blend-mode: difference;
}
}import gsap from 'https://cdn.skypack.dev/gsap@3.13.0'
const vertexShaderSource = `
attribute vec2 a_position;
void main() {
gl_Position = vec4(a_position, 0.0, 1.0);
}
`
const fragmentShaderSource = `
precision highp float;
uniform vec2 u_resolution;
uniform float u_time;
uniform float u_tap;
uniform float u_speed;
uniform float u_amplitude;
uniform float u_pulseMin;
uniform float u_pulseMax;
float noiseTrig(vec2 p) {
float x = p.x;
float y = p.y;
float n = sin(x * 1.0 + sin(y * 1.3)) * 0.5;
n += sin(y * 1.0 + sin(x * 1.1)) * 0.5;
n += sin((x + y) * 0.5) * 0.25;
n += sin((x - y) * 0.7) * 0.25;
return n * 0.5 + 0.5;
}
float fbm(vec2 p, vec3 a) {
float v = 0.0;
v += noiseTrig(p * a.x) * 0.50;
v += noiseTrig(p * a.y) * 1.50;
v += noiseTrig(p * a.z) * 0.1;
return v;
}
vec3 drawLines(vec2 uv, vec3 fbmOffset, vec3 color1, float secs) {
float timeVal = secs * 0.1;
vec3 finalColor = vec3(0.0);
vec3 colorSets[4];
colorSets[0] = vec3(1.0, 0.0, 0.1); // 赤
colorSets[1] = vec3(0.0, 0.2, 1.0); // 青
colorSets[2] = vec3(0.8, 0.0, 0.0); // 深い赤
colorSets[3] = vec3(0.1, 0.5, 1.0); // 明るい青
for(int i = 0; i < 4; i++) {
float indexAsFloat = float(i);
float amp = u_amplitude;
float period = 2.0 + (indexAsFloat + 2.0);
float thickness = mix(0.4, 0.2, noiseTrig(uv * 2.0));
float t = abs(1.0 / (sin(uv.y + fbm(uv + timeVal * period, fbmOffset)) * amp) * thickness);
finalColor += t * colorSets[i];
}
for(int i = 0; i < 4; i++) {
float indexAsFloat = float(i);
float amp = (u_amplitude * 0.5) + (indexAsFloat * 5.0);
float period = 9.0 + (indexAsFloat + 2.0);
float thickness = mix(0.1, 0.1, noiseTrig(uv * 12.0));
float t = abs(1.0 / (sin(uv.y + fbm(uv + timeVal * period, fbmOffset)) * amp) * thickness);
finalColor += t * colorSets[i] * color1;
}
return finalColor;
}
void main() {
vec2 uv = (gl_FragCoord.xy / u_resolution.x) * 1.0 - 1.0;
uv *= 1.5;
vec3 lineColor1 = vec3(1.0, 0.1, 0.1);
vec3 lineColor2 = vec3(0.1, 0.1, 1.0);
float spread = abs(u_tap);
float pulse = mix(u_pulseMin, u_pulseMax, sin(u_time) * 0.5 + 0.5);
vec3 finalColor = drawLines(uv, vec3(65.2, 40.0, 4.0), lineColor1, u_time * u_speed) * pulse;
finalColor += drawLines(uv, vec3(5.0 * spread / 2.0, 2.1 * spread, 1.0), lineColor2, u_time * u_speed);
gl_FragColor = vec4(finalColor, 1.0);
}
`
class ChaosButton {
constructor(button) {
this.button = button
this.canvas = button.querySelector('.chaos-canvas')
this.states = {
resting: {
speed: 0.35,
amplitude: 80,
pulseMin: 0.05,
pulseMax: 0.2,
tap: 1.0,
duration: 2.0,
ease: 'power2.out'
},
active: {
speed: 2.8,
amplitude: 10,
pulseMin: 0.05,
pulseMax: 0.4,
tap: 1.0,
duration: 0.26,
ease: 'power2.out'
}
}
this.startTime = Date.now()
this.lastTime = 0
this.phase = 0
this.currentSpeed = this.states.resting.speed
this.currentAmplitude = this.states.resting.amplitude
this.currentPulseMin = this.states.resting.pulseMin
this.currentPulseMax = this.states.resting.pulseMax
this.currentTap = this.states.resting.tap
this.setupWebGL()
this.setupEvents()
// 3. WebGLの準備ができたらフェードインさせる
requestAnimationFrame(() => {
this.render()
gsap.to(this.button, {
opacity: 1,
duration: 0.3
})
})
}
setupWebGL() {
const gl = this.canvas.getContext('webgl', {
alpha: false,
antialias: true
})
if (!gl) return
this.gl = gl
// キャンバスをクリアしておく
gl.clearColor(0, 0, 0, 1)
gl.clear(gl.COLOR_BUFFER_BIT)
const vs = gl.createShader(gl.VERTEX_SHADER)
gl.shaderSource(vs, vertexShaderSource)
gl.compileShader(vs)
const fs = gl.createShader(gl.FRAGMENT_SHADER)
gl.shaderSource(fs, fragmentShaderSource)
gl.compileShader(fs)
const program = gl.createProgram()
gl.attachShader(program, vs)
gl.attachShader(program, fs)
gl.linkProgram(program)
gl.useProgram(program)
this.program = program
const positions = new Float32Array([-1, -1, 1, -1, -1, 1, 1, 1])
const buffer = gl.createBuffer()
gl.bindBuffer(gl.ARRAY_BUFFER, buffer)
gl.bufferData(gl.ARRAY_BUFFER, positions, gl.STATIC_DRAW)
const posLoc = gl.getAttribLocation(program, 'a_position')
gl.enableVertexAttribArray(posLoc)
gl.vertexAttribPointer(posLoc, 2, gl.FLOAT, false, 0, 0)
this.uniforms = {
res: gl.getUniformLocation(program, 'u_resolution'),
time: gl.getUniformLocation(program, 'u_time'),
tap: gl.getUniformLocation(program, 'u_tap'),
speed: gl.getUniformLocation(program, 'u_speed'),
amp: gl.getUniformLocation(program, 'u_amplitude'),
pMin: gl.getUniformLocation(program, 'u_pulseMin'),
pMax: gl.getUniformLocation(program, 'u_pulseMax'),
}
this.resize()
}
resize() {
const dpr = Math.min(window.devicePixelRatio, 2)
const rect = this.button.getBoundingClientRect()
this.canvas.width = rect.width * dpr
this.canvas.height = rect.height * dpr
if (this.gl) {
this.gl.viewport(0, 0, this.canvas.width, this.canvas.height)
this.gl.uniform2f(this.uniforms.res, this.canvas.width, this.canvas.height)
}
}
setupEvents() {
const activate = () => {
gsap.killTweensOf(this)
gsap.to(this, {
currentSpeed: this.states.active.speed,
currentAmplitude: this.states.active.amplitude,
currentPulseMin: this.states.active.pulseMin,
currentPulseMax: this.states.active.pulseMax,
duration: this.states.active.duration,
ease: this.states.active.ease,
})
}
const deactivate = () => {
gsap.killTweensOf(this)
gsap.to(this, {
currentSpeed: this.states.resting.speed,
currentAmplitude: this.states.resting.amplitude,
currentPulseMin: this.states.resting.pulseMin,
currentPulseMax: this.states.resting.pulseMax,
duration: this.states.resting.duration,
ease: this.states.resting.ease,
})
}
this.button.addEventListener('mousedown', activate)
this.button.addEventListener('mouseup', deactivate)
this.button.addEventListener('mouseleave', deactivate)
this.button.addEventListener('touchstart', activate)
this.button.addEventListener('touchend', deactivate)
window.addEventListener('resize', () => this.resize())
}
render = () => {
const time = (Date.now() - this.startTime) / 1000
const deltaTime = time - this.lastTime
this.lastTime = time
this.phase += deltaTime * this.currentSpeed
if (this.phase > 1000) this.phase %= 1000
this.gl.uniform1f(this.uniforms.time, this.phase)
this.gl.uniform1f(this.uniforms.tap, this.currentTap)
this.gl.uniform1f(this.uniforms.speed, 1.0)
this.gl.uniform1f(this.uniforms.amp, this.currentAmplitude)
this.gl.uniform1f(this.uniforms.pMin, this.currentPulseMin)
this.gl.uniform1f(this.uniforms.pMax, this.currentPulseMax)
this.gl.drawArrays(this.gl.TRIANGLE_STRIP, 0, 4)
requestAnimationFrame(this.render)
}
}
new ChaosButton(document.querySelector('.chaos-button'))ボタン内部にcanvasを絶対配置し、WebGLでフルスクリーン四角形(TRIANGLE_STRIP)を描画しています。実際の模様はフラグメントシェーダーで生成しており、テクスチャ画像は使っていません。
時間(u_time)を進めながらノイズ関数とsin波を組み合わせ、赤・青系のラインが重なって流れるような見え方になります。
インタラクションは「通常」と「押下中」の2状態で、JS側の数値を切り替える設計です。押下すると速度・振幅・パルス幅が一気に変わり、離すとゆっくり元に戻ります。
ここはGSAPで補間しているため、カクッと切り替わらず滑らかに状態遷移します。初期表示時はホワイトフラッシュを避けるため、HTML/Bodyを黒固定+ボタンをopacity:0にしておき、WebGL準備後にフェードインしています。
requestAnimationFrameで常時描画opacity:0→準備完了後にフェードイン見た目の印象は、主に「スピード」「線の細かさ」「脈動の強さ」で決まります。調整ポイントがJS側にまとまっているので、デザイン検証もしやすいです。
まずはstates.restingとstates.activeの数値を触るのが手早いです。
states.active.speed / states.active.amplitudepulseMin / pulseMaxstates.resting.duration(長いほどゆっくり戻る).chaos-buttonのwidth/height(Canvasは自動で追従)色味を変えたい場合は、シェーダー内のcolorSets(赤・青の配列)を差し替えるのが最短です。
雰囲気を大きく変えるなら、drawLines()内のfrequencyやthickness計算を調整すると効果が出ます。
この表現はWebGLに依存するため、WebGL非対応環境では表示できません。
また、常時requestAnimationFrameで描画しているので、低スペック端末ではバッテリーや発熱の影響が出ることがあります。
必要なら、画面外では停止する・ホバー時だけ動かすなどの運用が安全です。
イベントはmousedown/touchstart系を使っているため、環境によっては「タップ→スクロール」などの挙動と干渉する可能性があります。
実装先のUI要件に合わせて、pointerdown/pointerupへの統一も検討できます。さらに、シェーダーのコンパイル失敗時のフォールバック(静的背景や通常ボタン表示)を用意しておくと堅牢になります。
pointer系へ統一すると扱いやすい